|
|
Were
you looking for my pics and videos? Click here:
Breasts: A How-To Guide,
Part 2
10/19/07
Ok, at this point I'm assuming you've read 2 things
already, or at least have some prior knowledge of them . . . first
is an overview of breast and bra sizes and shapes from my clothes
section. Second is Breasts 101 which
covers reasons for using breastform alternatives, and the basic
method of stuffing. If stuffing is working fine for you, don't
bother with this article. If you have money you can also skip
this - no sense making an "acceptable" breastform with
a lot of work if you can afford a fabulous pre-made one. If you're
still reading, the below sections will explain a couple methods
for crafting your own breastforms at home.
The most straightforward home breastform is basicaly
permanent stuffing. The idea here is to sew (yes, you will need
to be able to sew for this one) a decently shaped breast which
you will then stuff like a stuffed animal or pillow. This way
you only have to worry about matching the size and shape of each
breast once - after that you just tuck and go. The downfalls of
course are that fabric breasts are mostly air - they are lightweight
and will not bounce, the are easy to flatten under a tight shirt,
and they are not "squeezable".
A sewn breastform can be made in any of the breastform
shapes illustrated in the clothes
section, though the easiest of course is the round form. Conveniently,
the back of the form will be a flat outline of the form's shape
(to fit your chest), and the protruding portion of the form will
be made of "triangles" of fabric that line the circumference
of the backing and join at a point where the "nipple"
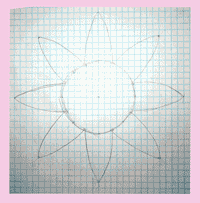
will be. Below is a generic round breastform pattern. You might
also try seaching the net for "knitted breast form"
- I don't know squat about knitting, but it seems to be a popular
method.

8 "triangles" is probably a good place
to start, as they will be easy to space evenly around the round
center. But experiment with different numbers - more triangles
= more sewing! The diameter of the circle should be about 1/8
you chest circumference. For example, I wear a 34-36" bra
band, so the diameter of each breast would be between 34/8 = 4"
and 36/8 = 4.5". To find the height of the traingles from
circles edge to peak, use the formula:
h = sqrt( r^2 + cup^2 ) + 1/4"
where r is the radius of the circle (half the diameter), and cup
is 1/2 for an A cup, 1 for a B cup, 1.5 for a C cup, etc. For
example, to make a C cup breast for my 34" band, the circle
diameter would be 4". That makes the radius 2". The
cup value for a C cup is 1.5". So the triangle height would
be sqrt( 2^2 + 1.5^2 ) + 1/4" = sqrt( 4 + 2.25 ) + 1/4"
= 2.5 + 1/4" = 2.75"
Also make sure you "plump out" the triangles by about
1/4" - see the example pattern, the traingle's edges are
not straight, but bend outward.
Now sew the edges of neighboring triangles together,
leaving a bit of room at the tips, by pinching the edges of the
triangles together. Once all the edges are sewn, turn the form
inside-out so it has a finished look. Now stuff the form with
stuffing, making it as firm or soft as you like. Finish the job
by stitching the tips of the triangles together to hold the stuffing
in, and add a button as a nipple if you like.
You could also add a small (smooth!) rock or other
weighted object near the base of the form before sewing it closed
to give the form a bit more natural feel when you wear it, but
this is just personal preference - it will have no impact on the
visual effect of the breast.
|